Imagico photo log
Why you should not use levels adjustment
Nearly all imaging programs you can find today offer a function that is commonly called levels tool. And according to what i observe this is one of the most frequently used tools for digital photograph editing these days. What i want to explain here is why use of this function is often a bad idea.
The basics
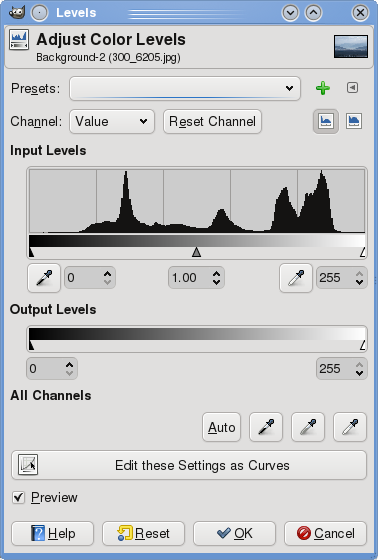
A typical levels dialog is shown above. It primarily consists of a slide rule representing the range of tone levels (the upper one subscribed 'Input levels') and two or three markers that can be moved across it. Above this a histogram of the image is commonly shown as a visual hint for adjusting the levels. The leftmost marker on the slide rule is usually called the black point, the rightmost one the white point. The third maker - if it exists - is commonly called something like midtone. In case of color image the whole thing can be adjusted separately for the red, green and blue color channel of the image.
The concept that most books and tutorials about levels adjustment tend to explain is that the slide rule represents the brightness levels of the image and that by moving the black point and white point you can "stretch" the existing brightness levels of the image to cover the full range of brightness levels that can be represented.
Light intensities
What these books and tutorials do not explain is what quantity is actually represented by the slide rule. It is essential to understand this to comprehend what the levels adjustment does. I will however start with explaining what would happen if the levels adjustment operated on the plain, unmodified light intensities recorded by the camera sensor.
Changing the white point in this case would be nothing more than an exposure compensation. Playing the white point at half the maximum recordable intensity would be the same as an exposure compensation of +1EV. When this is done differently on all three color channels we would do a white balancing. Changing the black point is something completely different. Mathematically it subtracts a certain intensity from every intensity value in the image. Now this at first seems not a very sensible operation from a physical perspective. But imagine a long distance long focal length landscape view on a hazy day. This will usually lead to a low contrast photo with no really dark areas due to the haze like in the example below. Due to the scattering effect of the haze it introduces unwanted light into the image and it would be a reasonable idea to try compensating for the haze by subtracting the color of this scattered light as it would appear in front of a completely black background from the intensity data. This of course only works if the effect of the haze is uniform across the image (which usually requires a relatively small picture angle and a similar distance of all parts of the image). Another effect that could be addressed by such a form of black point adjustment is lens flare. From a practical standpoint applying such a compensation is quite difficult though since there are often no really black areas in the image you can can base the compensation on.

To sum it up – a levels tool working on the light intensities returned by the camera sensor could be used for exposure compensation and white balancing by setting the white point and for compensating the effects of uniform haze or lens flare by setting the black point.
Color representation in the computer
In reality the brightness levels the levels adjustment operates on are the values used by the computer to represent the image pixels though. These are not the same values that are recorded by the sensor of a digital camera. Between the sensor values (which are the light intensities, the amount of light recorded by the sensor) and the brightness levels in the imaging program the following things happen (either inside the camera - if you shoot jpeg or in the raw converter):
- White balancing, which means the intensities of the different colors (red, green and blue) each are multiplied with certain factors
- Color profiling, which essentially mixes the red, green and blue intensities to calculate new, differently defined red, green and blue intensities. This is necessary since the color sensitivities of the camera sensors red, green and blue pixels are different from the emission characteristics of the red, green and blue pixels of your monitor.
- Gamma encoding, which applies a function of the form
level = intensity1/Gammawith in most cases a value ofGamma = 2.2. The reason for this is that historically computer displays required input levels distorted this way since cathode ray tubes (CRTs) had an emission characteristic following approximatelyintensity = levelGamma. Newer TFT monitors apply this Gamma decoding in their signal processing to mimic the behavior of CRTs.
Steps 1 and 2 are actually not very important, they are what in mathematics is called linear (to be correct here the color profile is not really a linear operation but this is not of much importance here). This means applying the levels adjustment before or after these two steps will not make any difference. We will therefore just ignore them.
Gamma encoding (step 3) on the other hand changes things quite significantly. I will use a simple number example to illustrate that. Let us first imagine two areas of an image have certain light intensities. I will represent those as color triples of the form (red, green, blue). The first of these areas is brighter leading to the sensor recording twice the light (0.8, 0.6, 0.6) – but with the same color so the same ratio of the intensities in the three color channels as the darker area (0.4, 0.3, 0.3). What happens if we set the white point to the first color either before or after gamma encoding is shown below.
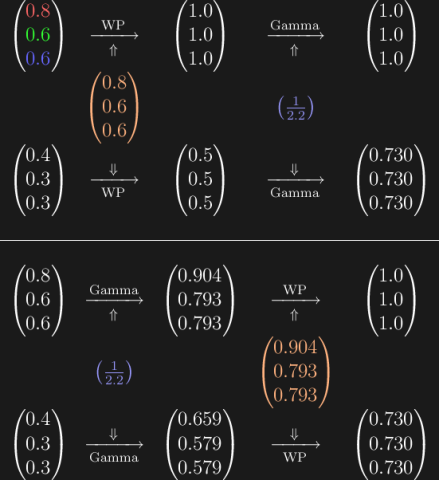
As you can see it does not make a difference if the white point is adjusted before or after gamma encoding. Adjusting the white point in a levels tool is always simply an exposure compensation and white balancing.
Now what happens when you adjust the black point? Let us imagine a gray object being photographed through some bluish haze. Two parts of the image are recorded with the light intensities used in the following example and the back point adjustment used results in two tones of gray when applied before gamma encoding. What happens if a black point adjustment that results in the same tone of gray for the first, brighter part is applied after gamma encoding?

As can be seen it does not result in a tone of gray for the second, darker color. The difference is not huge but it definitely leads to a color distortion. Remember when i explained above how a black point adjustment on the raw intensities can be used to compensate for haze or lens flare in photos in a physically correct way. This is no more the case when it is applied after gamma encoding. Black point adjustment on gamma encoded brightness levels like used in most imaging programs does not perform a physically sensible operation and will lead to unnatural color tones in the image.
Conclusions
What should be learned from this are two thing. First: What is usually intended by using a levels adjustment should be better performed using the raw converter. You should keep in mind however that those raw converters that offer a kind of black point adjustment usually do not perform a simple subtraction as described above but a more sophisticated operation to minimize ugly results when the haze or lens flare to be compensated is not uniform and you have to either over- or undercompensate in some parts of the image.
Second: You can still use the normal levels adjustment of course. Especially when you work on black and white images where the problem demonstrated above has no effect. The advantage of the gamma encoded colors is that they more closely resemble our human perception of light intensities than the raw intensities from the image sensor. When using levels adjustment on color photos just keep in mind the resulting colors are more or less artificial as soon as you change the black point in a significant way.
Kommentare:
noch keine Kommentare.
Durch das Abschicken Ihres Kommentars stimmen Sie der Datenschutzrichtlinie zu und erlauben, dass die eingegebenen Informationen (mit Ausnahme der eMail-Adresse) in diesem Blog veröffentlicht werden.