


HCR-Edit
An editor for high color resolution images.
Version 0.5 beta
Documentation
written June 2002 - February 2003 by Christoph Hormann
chris_hormann@gmx.de
Introduction
HCR-Edit is a tool for manipulating high color resolution images. High color resolution means more accurate color values than the common 3x8=24 bit.
The main purpose of this tool is to post process
![]() POV-Ray generated images, but it
can be used for other image data like photographs, scans etc. too
POV-Ray generated images, but it
can be used for other image data like photographs, scans etc. too
This program is in beta stage which means that not everything is probably working as expected - this includes the documentation. Please report problems you find while using the program. I'm also open for suggestions for additional program functions.
Program basics
HCR-Edit is a Windows application programmed in Delphi. The image files are displayed in the left part of the program window and the results of modifications can be seen immediately.
There are two main types of editing actions, adjustments and modifications. The latter are true permanent modifications of the image data while the former are only final adjustments to the image. Turning back the adjustments to neutral values always recreates the original state.
The image data is maintained as single precision floating point values. This means for grayscale images 32 bit of memory are required per pixel, Color images need three times as much.
general program functions
This chapter describes the general program functions including file loading and saving as well as clipboard functions
Most of these functions can be accessed through the program main menu as well as the toolbar.
- viewing the documentation:
the documentation can be accessed from within the program

loads the documentation file via default browser.
- exiting the program:
when closing the program you will be asked whether to save the file in case you have made modifications.

closes the program.
file functions
HCR-Edit can read and write a variety of different image file formats.
- reading:
the file formats currently supported are:
opens an image file via standard dialog.
- Portable Network Graphic (PNG)
HCR-Edit can read 24 and 48 bit rgb as well as 8 and 16 bit grayscale files. - TGA
only uncompressed files with 24 bit rgb, 8 bit files with palette are read as grayscale. - Portable Pixmap (PPM)/Portable Graymap (PGM)
HCR-Edit can read PPM/PGM files in both ASCII and binary form with 8 or 16 bit values. With ASCII files this function is also capable of reading float values. - High Dynamic Range Image (HDR)
 Radiance RGBE high dynamic range image files can be read with HCR-Edit.
- Raw binary data
Raw binary data data of various forms can be read, the format is specified in a separate dialog box.
- Portable Network Graphic (PNG)
- writing:
the file formats currently supported are:
saves the current image using the adjustments. Usually color values are clipped to a finite range defined by the file format. For High dynamic range and floating point formats the values are not clipped and only brightness, contrast and gamma correction are applied.
- Portable Network Graphic (PNG)
like for reading 24/48 bit rgb and 8/16 bit grayscale format are supported. - TGA
HCR-Edit writes uncompressed 24 bit rgb and 8 bit grayscale TGA files. - portable pixmap (PPM)
binary PPM files can be written with both 8 and 16 bit accuracy. Grayscale (PGM) files are supported too. - High Dynamic Range Image (HDR)
Radiance RGBE high dynamic range image files
- RAW 32 bit float data
- Portable Network Graphic (PNG)
- merging:
with this function you can add a horizontal stripe from a second image file and thereby combine an image from partial renders for example.
opens the merging dialog.
Currently only PNG files are supported here.
general editing functions
- undo:

undoes the last modification. Only one undo step is available. Adjustments do not require undo. To save memory when editing large files this function can be turned off via the main menu.
clipboard functions
HCR-Edit can import and export image data via the Windows clipboard. This function is mainly intended for exchanging image data with other applications. Only 24 bit rgb and 8 bit grayscale data is supported.
adjustments

This chapter describes the adjustments that can be applied to the image using the controls on the adjust panel.
These adjustments are always applied 'on the fly' which means they don't actually influence the image data in the system. Every time the display is updated of you save the data to a file they are applied. This means that the effect of modifications does not depend on the values here.
![]() On top of the panel there is a checkbox named live update.
Activating it leads to the display being continuously updated when values
are changed. If this function is deactivated the image display can be
updated using the Update button.
On top of the panel there is a checkbox named live update.
Activating it leads to the display being continuously updated when values
are changed. If this function is deactivated the image display can be
updated using the Update button.
Currently the following adjustments are supported:
- gamma:
applies a gamma correction to the image. Any positive values are allowed. - brightness:
changes the brightness of the image.0.0means no change. A value of0.1applied to a50%gray image leads to a60%gray result. Allowed values are between-1.0and1.0. - contrast:
changes the contrast of the image. A value of1.0leads to no change.2.0means a range of gray values from25%to75%being expanded to0%..100%. Any values are allowed.
The complete formula for calculating the values is:
New_Color = ((Old_Color-0.5)*Contrast+0.5+Brightness)Gamma
with color values in the range of 0.0 to 1.0.
More sophisticated adjustments are handled in separate windows, they can be activated with a checkbox next to the button. This checkboxes should only be checked if you use the corresponding adjustment, otherwise the calculations will be unnecessarily slow.
- color curves:
The color curves supply detailed control over the colors.
 Pressing the color curves button shows the
color curves adjustment window.
Pressing the color curves button shows the
color curves adjustment window. - levels:
The levels tool allows to adjust color range and balance of an image with help of the histogram.
 Pressing the levels button shows the
levels adjustment window.
Pressing the levels button shows the
levels adjustment window. - exposure:
This tool can be used to apply a film exposure correction to an image
 Pressing the exposure button shows the
exposure adjustment window.
Pressing the exposure button shows the
exposure adjustment window.
modifications

In contrast to the adjustments modifications permanently influence the internal data representation. This means that modifying twice leads to a double application of the function.
The following modification function are available:
- thresholded smooth:
Thresholded smooth means a smoothing filter is only applied if neighboring pixels differ in their color by at least a certain threshold amount. This amount is given by the threshold value. A value of0.0means the filter is applied to all pixels. A value of0.5means the pixel color values in the direct neighborhood have to differ at least by0.5for the filter to be applied. In color images the maximum of all three channels is used. - normalizing function:
Normalizing compresses/expands the dynamic range of an image to a certain range of values. The minimum and maximum value can be adjusted. - focal blur:
 Pressing the color curves button shows the
focal blur window.
Pressing the color curves button shows the
focal blur window.
The program window elements
The main menu

|

|

|
|

|
- file:
- edit:
- view:
- color curves: displays the color curves adjustment window.
- focal blur: displays the focal blur window.
- levels: displays the levels adjustment window.
- exposure: displays the exposure adjustment window.
- options:
- Undo enabled: toggles the undo function.
- help:
- documentation: loads the program documentation.
- about: shows the program info box.
The statusbar
![]()
Shows some status information:
- On the left the position and color value (in POV-Ray notation) are shown when the mouse pointer is inside the image display. Furthermore general status informations are shown here.
- In the middle field you can see a progress indicator when a file or modification function is in progress.
- The right field shows information about the file type of the current file being handled.
The additional program windows
The raw import window
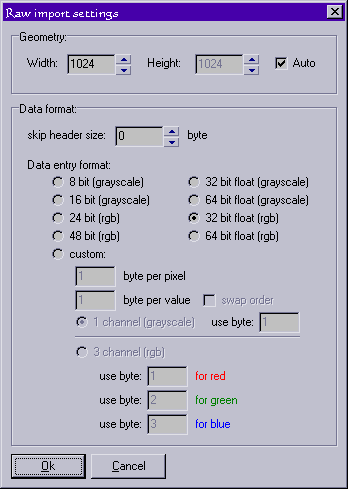
HCR-Edit allows detailed control over the the file format specifications when importing raw data. This way a large variety of file formats can be read. The adjustments are made in this dialog.
First the width and height of the image have to be specified (in pixel) the height can be concluded automatically from the file size if the 'auto' checkbox is activated.
Then the number of header bytes to be skipped can be specified.
Finally you have to adjust the format of the actual data in the file. There are
4 prepared settings for 8 and 16 bit single channel integer data as well as 3 channel data
in order RGB. Furthermore 32 bit (single) and 64 bit (double)
float data can be loaded as both single channel (grayscale) and rgb.
Other custom integer formats have to be defined using the custom settings.
These settings consist of the number of bytes per pixel and per data value and the starting byte for each value. This way you can also extract three color channels from file formats containing more than three data channels.
The color curves window
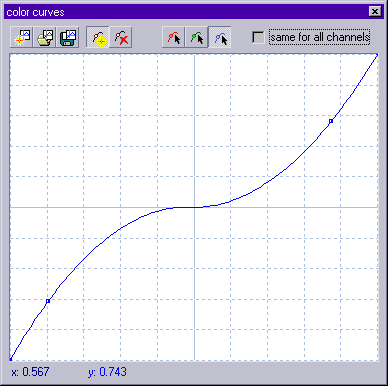
The color curves are transmission curves for the color values of the
image. a color value x is translated into a
value y according to a spline function.
If same for all channels is checked there is only one curve for all color channels no matter if the image is grayscale or rgb.
-
 Clears the spline knots and creates a linear transmission curve.
-
 Opens a standard file dialog for loading a curve from a file.
-
 Opens a standard file dialog for saving the current curve from a file.
Depending on whether
![]() or
or
![]() is pressed there is a new knot added to the active spline or the
active knot is deleted when the right mouse button is pressed.
is pressed there is a new knot added to the active spline or the
active knot is deleted when the right mouse button is pressed.
The remaining buttons can be used for activating the different channels and editing the curves individually.
The exposure window
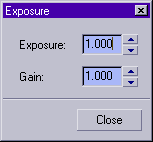
The exposure settings are applying a exponential film exposure simulation to the image. The color values are trated with the formula:
New_Color = Gain * (1 - exp( - Exposure * Old_Color))
The values for Gain and Exposure
can be adjusted in the window.
The focal blur window

This function is intended for applying focal blur to an image. For this purpose it uses depth data in form of a second grayscale image that has to fit to the image the function is applied to.
A lot of 3D programs have functions to generate a depth image from a scene
(also known as z-buffer). With POV-Ray you can texture the whole scene in ambient
white and add an ambient black fog or apply a spherical pattern texture ranging
from black to white to get the depth output. Don't forget to add
hf_gray_16 on to global_settings
to get 16 bit accuracy output.
In addition to the data file there are 3 values to control the blur:
- The amount is the maximum intensity of the blur. Any positive values are allowed.
- The bleed reduction should reduce bleeding at borders between strongly
blurred and less blurred regions. This function is very experimental. A value of
0turns it off. - The radius specifies the size of the blur matrix. This strongly influences the intensity of the blur. Higher values make the calculation very slow.
Finally you can control which distances to blur and which to maintain untouched with a transmission curve for the depth data. The curve editor works like in the color curve window.
The merging dialog
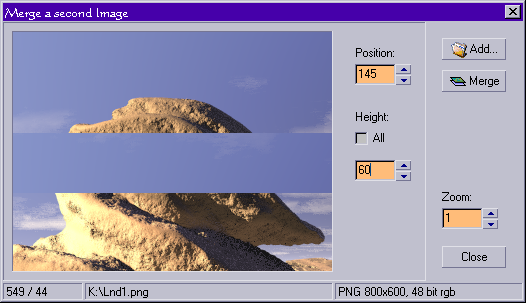
This window allows to merge the content of a second image file (or parts of it) into the
currently loaded image. This function is mainly intended for merging partial renders
into one image. Right now you can only specify the vertical position, therefore the function
is only suited for merging horizontal stripes, for example renderd with POV-Ray using the
+sr / +er options. HCR-Edit is also
capable to read PNG files from interrupted POV-Ray renders.
The image file to be merge is opened using the Add button at the upper right of the window. Only PNG files are possible here right now.
The vertival starting position for the merged stripe is either given in the Position box or interactively using the mouse in the preview window. You can either merge the whole image or only a specified number of lines. For precise positioning of the image you can magnify the preview window with the Zoom function.
Pressing the Merge button finally merges the image into the into the main image data.
The levels window
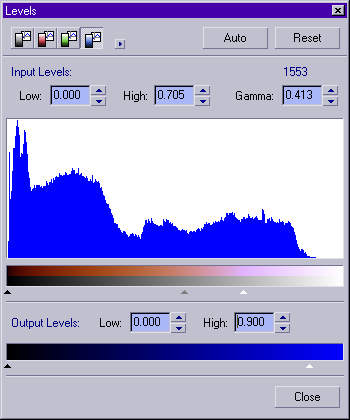
The levels tool adjusts color range and balance of the loaded image. The image histogram is displayed for helping to find the correct values.
The Input levels specify what cange of color values from the unmodified data is supposed to be used for the resulting image. Values above or below this range are clipped. For the transit between those values you can choose a gamma exponent. This transformation applied to a black-white gradient is displayed below the histogram.
The Output levels specify what range of the possible output values is supposed to be used in the resulting image.
When editing color images each of these adjustments is available for each color channel separately and for all channels combined. For editing the different channels use the button set on the upper left.
There is an additional automatic selection of values available through the Auto button. This function is based on an analysis of the histogram.
The small button next to the channels selector expands controls for specifying the histogram resolution and a parameter for the auto adjustment.
Change history
This is a list of changes and new features added in the recent versions.
version 0.5.0 beta
- added support for reading and writing HDR high dynamic range images.
- added support for reading raw float data.
- added support for writing binary and ASCII float data.
- added exposure adjustments.
- added normalizing function.
- improved handling of incomplete images.
- now remembering file format settings in file dialogs.
- various improvements and fixes.
version 0.4.0 beta
- changed byte order of 48 bit color PPM files for being compatible with POV-Ray.
- allowed loading of PNGs from interrupted POV-Ray renders.
- improved handling of large image files.
- added function for merging several image files.
- added 'levels' color correction tool.
- various minor improvements.
version 0.3.0 beta
- fixed error in calling the documentation from within the program.
- added variable blur radius for focal blur.
- improved focal blur speed.
- fixed missing warning when leaving new file or closing after changes.
- fixed non functional color curves in grayscale images.
version 0.2.0 beta
- fixing missing warning when exiting after changes.
- fixing swapped color channels on various occasions.
- decreased stepping of brightness change.
- added undo function for modifications.
- added saving of program settings when exiting.
- added color curve adjustment function.
- added focal blur post processing using a depth image.
version 0.1.0 beta
- initial public version
Legal stuff
This program is free for private use. Distribution via public servers on the internet or on discs/CD-ROMs etc. for selling is not allowed without permission.
No warranty of any kind is made for this program.
Christoph Hormann, June 2002 - February 2003
